
One of the first questions asked whenever a system or application goes down is “what changed recently”. Ill-planned or unplanned changes are often the underlying cause of failures. And if you live on the Operations side of the IT fence like me, a large portion of your existence is dedicated to mitigating the negative impact of these age accelerating events.
To help in this ongoing battle, you can leverage Azure Configuration Management. This feature is comprised of three tools: Inventory, Change tracking and State configuration (DSC). Inventory gives you a view of installed software, Windows services, registry keys, files and Linux Daemons that are present on your machine. Change Tracking monitors and reports changes to these items. And DSC allows you to compile configuration files to maintain a desired state for these monitored sources. Configuration Management can be used for machines that are in Azure of course, but also an On-Premises data center and other cloud services. For non-Azure machines, the data is gathered by an installed agent and reported back to Azure, where it is stored in a Log Analytics Workspace.
This article will be the first in a three part series that covers the components of Azure Configuration Management and how they can be used with a virtual machine running in AWS EC2. In part 1, I will show you how to get started using Inventory and provide an overview of it’s capabilities. Part 2 will cover Change Tracking and Part 3 will outline State configuration (DSC).
Prerequisites
Here’s what is needed:
- An Automation account in Azure
- A Log Analytics Workspace
- A non-Azure VM (AWS)
I’m not going to outline the steps of creating the above resources. Here, I will just focus on the process of enabling and using Inventory.
How to Enable Inventory
In the Azure portal, go to your Automation account and select “Inventory” under Configuration Management. On the popup screen that appears, select your subscription and the Log Analytics Workspace in the drop-down menus, and click on the enable button. This step will also enable Change Tracking.

The next step is to configure the virtual machine to communicate with Log Analytics.
Configure Non-Azure Machine
This Microsoft doc explains the following in more detail. For this task, I will be using an AWS t2.micro instance of Windows 2016. The first thing that needs to be done is to add registry subkeys for TLS 1.2 and .Net Framework to use strong cryptography. The Microsoft Monitoring Agent (MMA) that will be installed, uses TLS 1.2 to report changes to the Log Analytics service in Azure. Here are the Registry Keys for TLS 1.2 and .NET 4.6 that need to be added:
- HKLM\System\System\CurrentControlSet\Control\SecurityProviders\SCHANNEL\Protocols\TLS 1.2\Client – you will need to create the TLS 1.2 and Client subkeys. And in the Client subkey, create the following DWORD value:
- Enabled [Value = 1]
- DisabledByDefault [Value = 0]
- HKEY_LOCAL_MACHINE\SOFTWARE\Microsoft\.NETFramework\v4.0.30319 – no subkeys need to be created; create the following DWORD value: SchUseStrongCrypto with a value of 1.
- HKEY_LOCAL_MACHINE\SOFTWARE\WOW6432Node\Microsoft\.NETFramework\v4.0.30319 – no subkeys need to be created; created the DWORD value SchUseStrongCrypto with a value of 1.
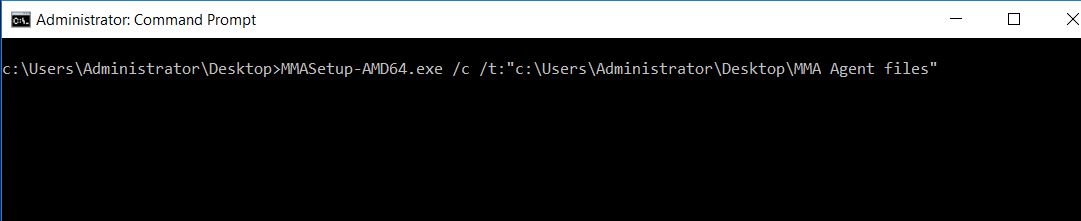
Now that the Registry edits have been completed, the MMA can be installed. There are three options for installing the agent: the installation wizard, command line or Powershell DSC. In this case, I will use the command line. Also, there are two agent options: a 64-bit and 32-bit version. Once the appropriate agent has been downloaded, open an elevated command prompt, navigate to the location of the file and run the following command to extract the MSI file to a folder path. Finally, install the agent with the extracted MSI file.
Once the agent is installed you can verify the installation a couple of ways. In Control Panel, go to MMA Agent to check that it’s intstalled as seen here.

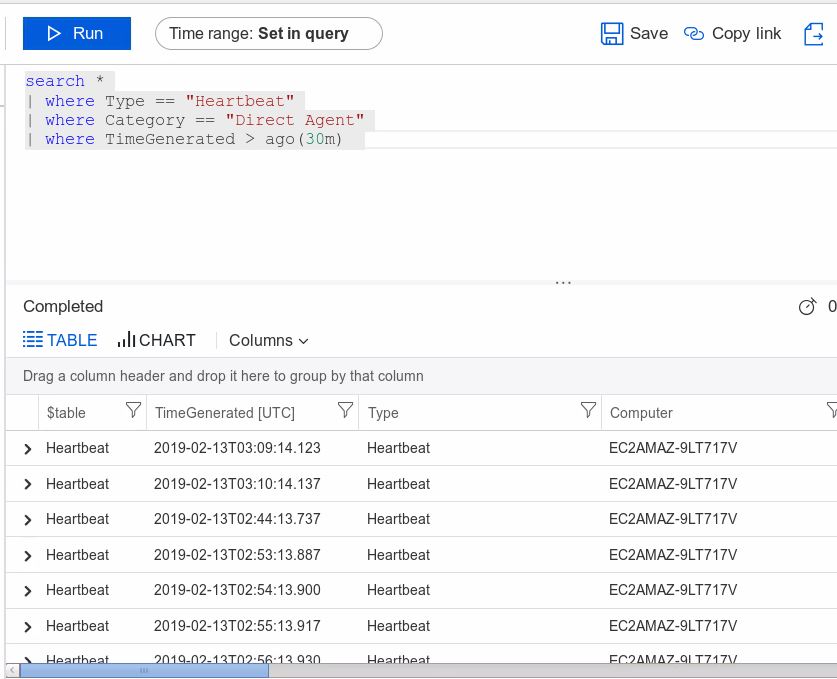
Also, in the Azure Portal, you can run a search query to check that the agent has a heartbeat and is communicating with Log Analytics. Go to the Logs tab on your Workspace to run the query. The following figure shows there’s a heartbeat detected from the AWS EC2 instance.
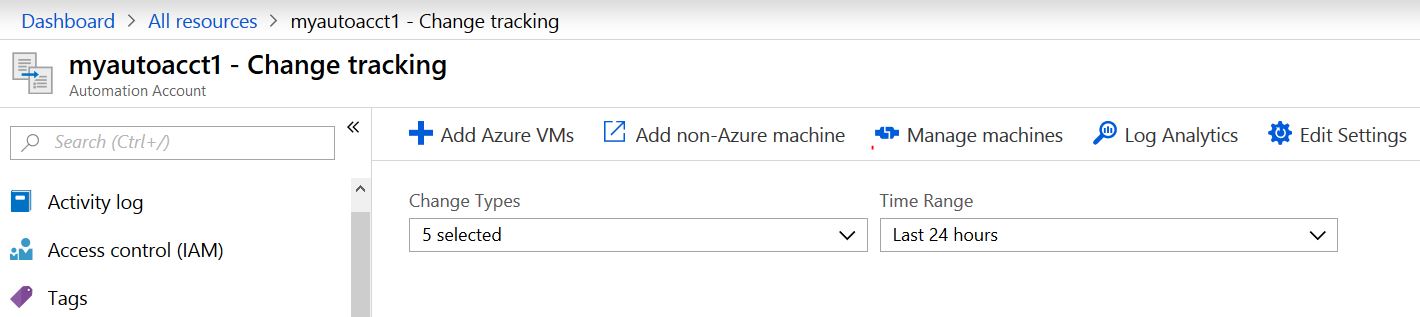
Now that the VM is communicating with Azure, we can complete the onboarding of the AWS VM. Go back to Inventory and you will see a new screen with various options: A button to Add Azure VMs; a doc on how to Add non-Azure machine; another button to Manage Machines. Click on Manage Machines.
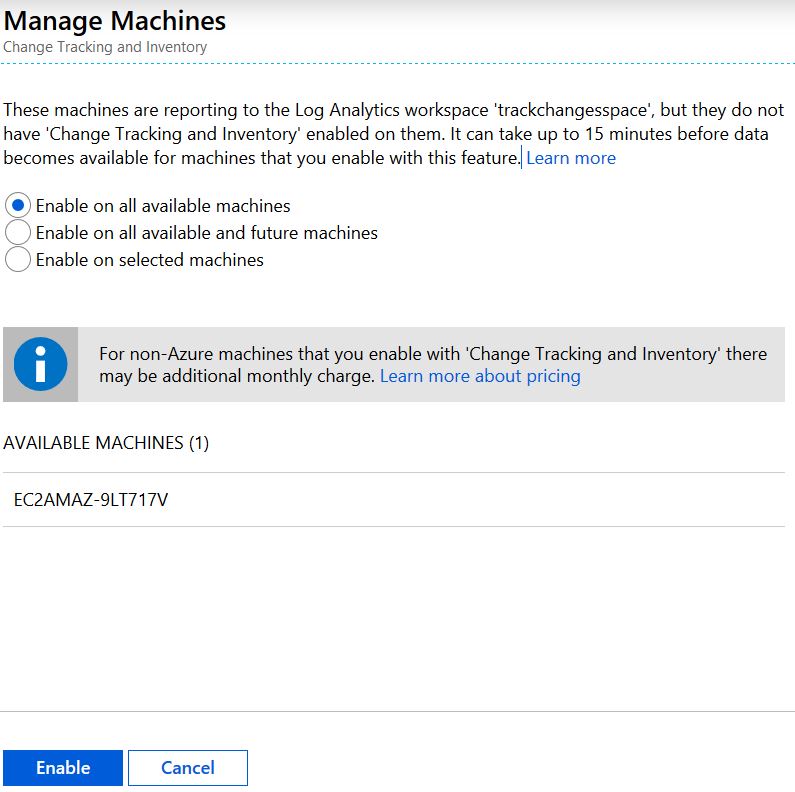
Now you can see the AWS EC2 instance as an available machine. You have three options to choose on how to enable Change Tracking and Inventory. I select the default to “Enable on all available machines and click enable.
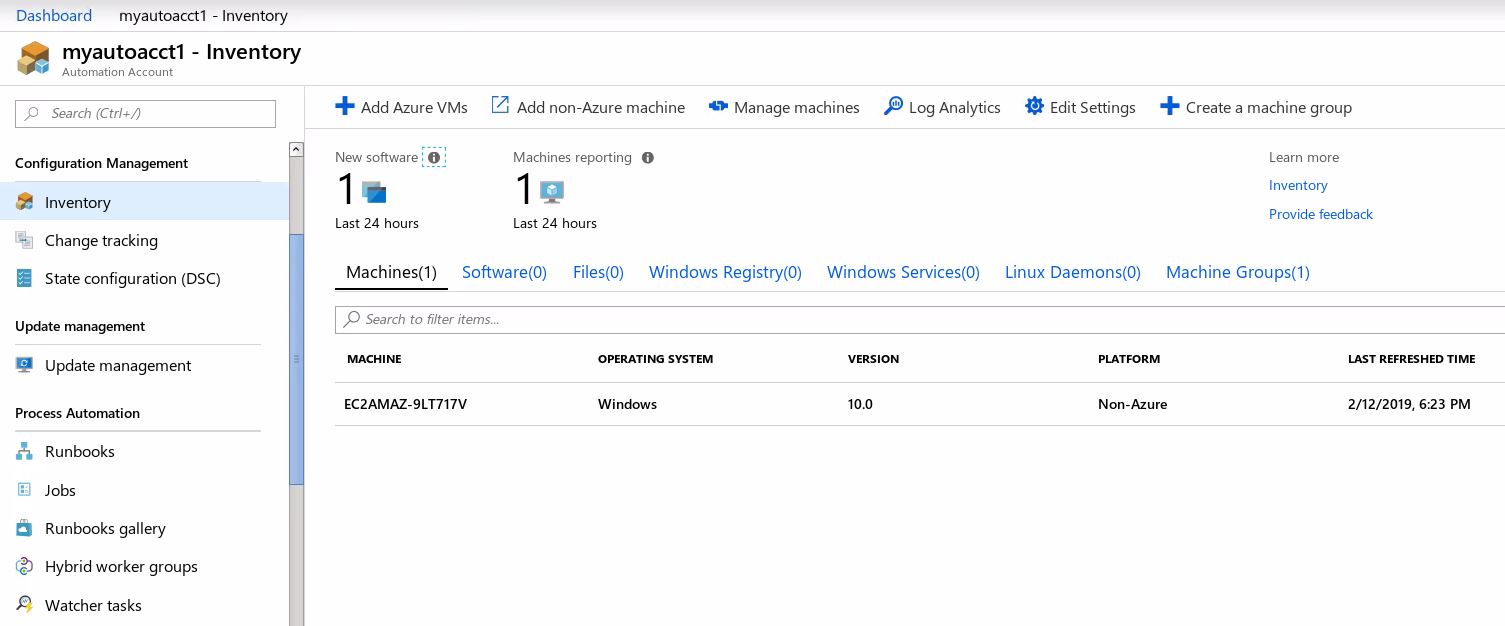
Inventory
Now that the Inventory has been enabled, the agent has been installed and the machine is reporting to Azure, let’s see what we get out of the box. First, if you go to the Inventory tab of your Automation account, it will show you the machine(s) reporting, along with details about the machine (O/S, version, platform, etc). Additionally, there are tabs to view the software installed on the node, along with Windows services, Windows Registry keys and Linux daemons if applicable. You will need to configure Files and Registry keys to monitor under Edit settings. I will demonstrate that in the next article on Change Tracking.
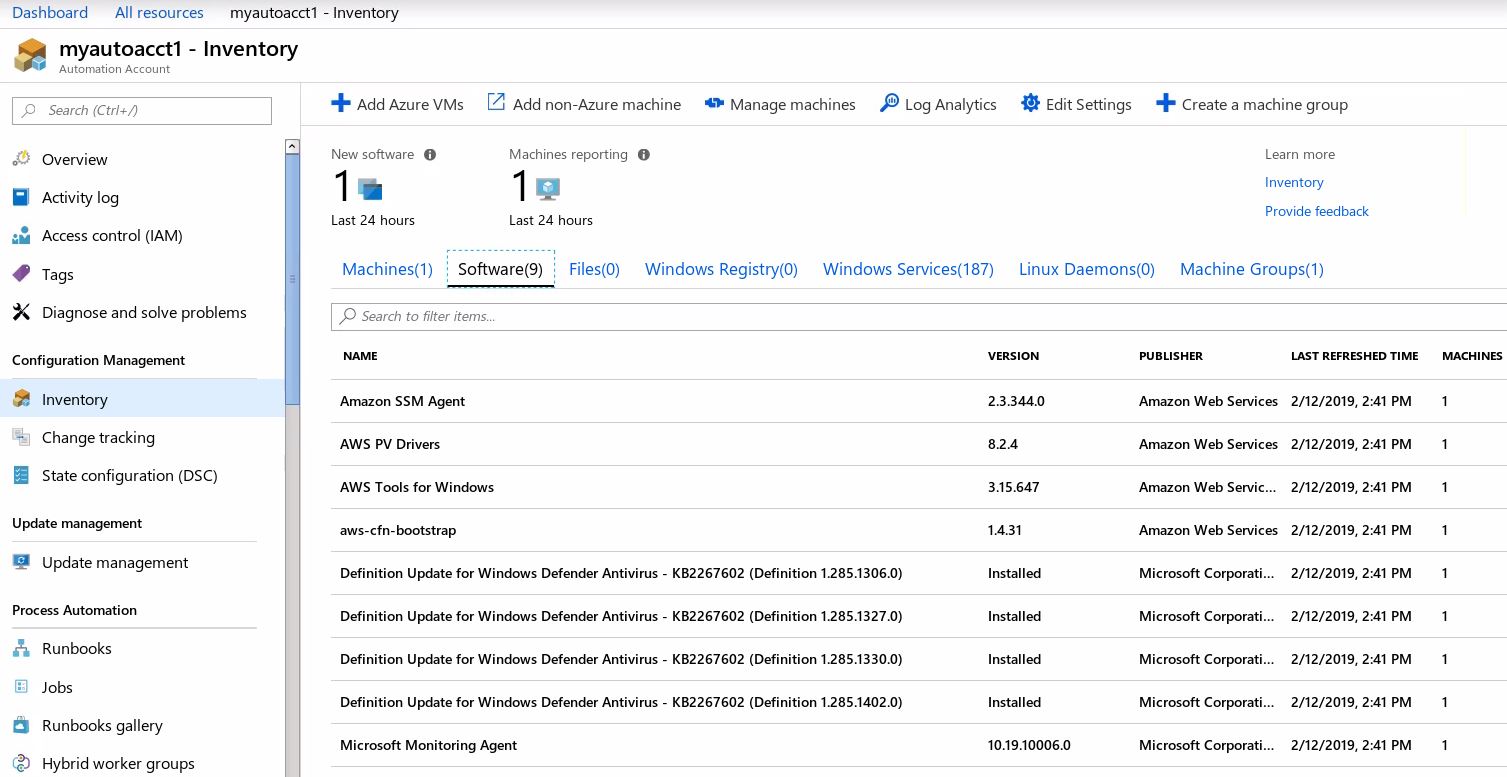
To see the installed software, click on the “Software” tab. It will show the software name, version, publisher, last refreshed time and number of machines it’s installed on.
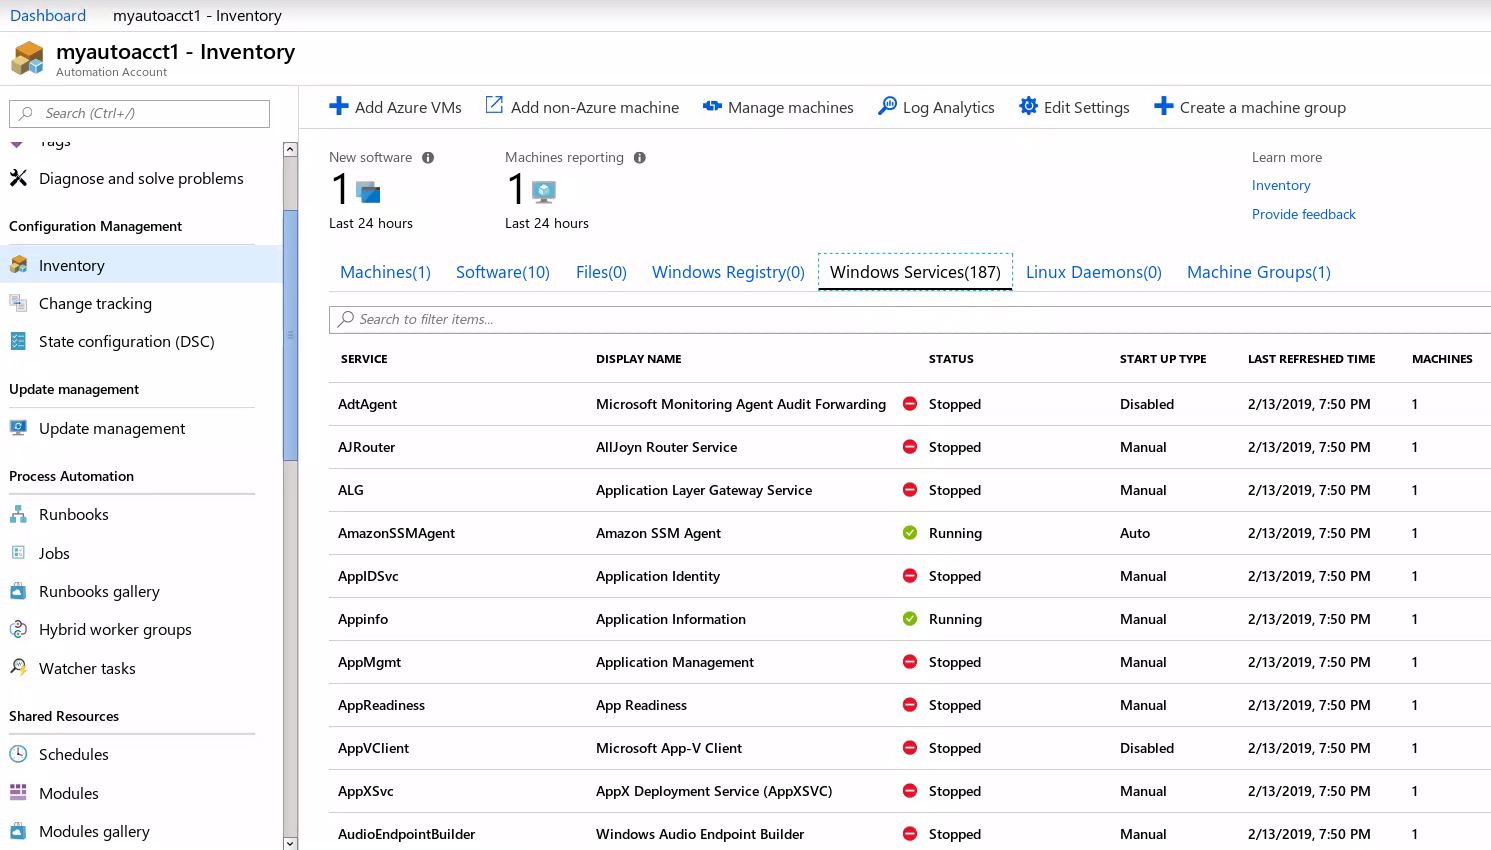
Also, go to the “Windows Services” tab to see details such as the service name, status, startup type, last refreshed time and number of machines.
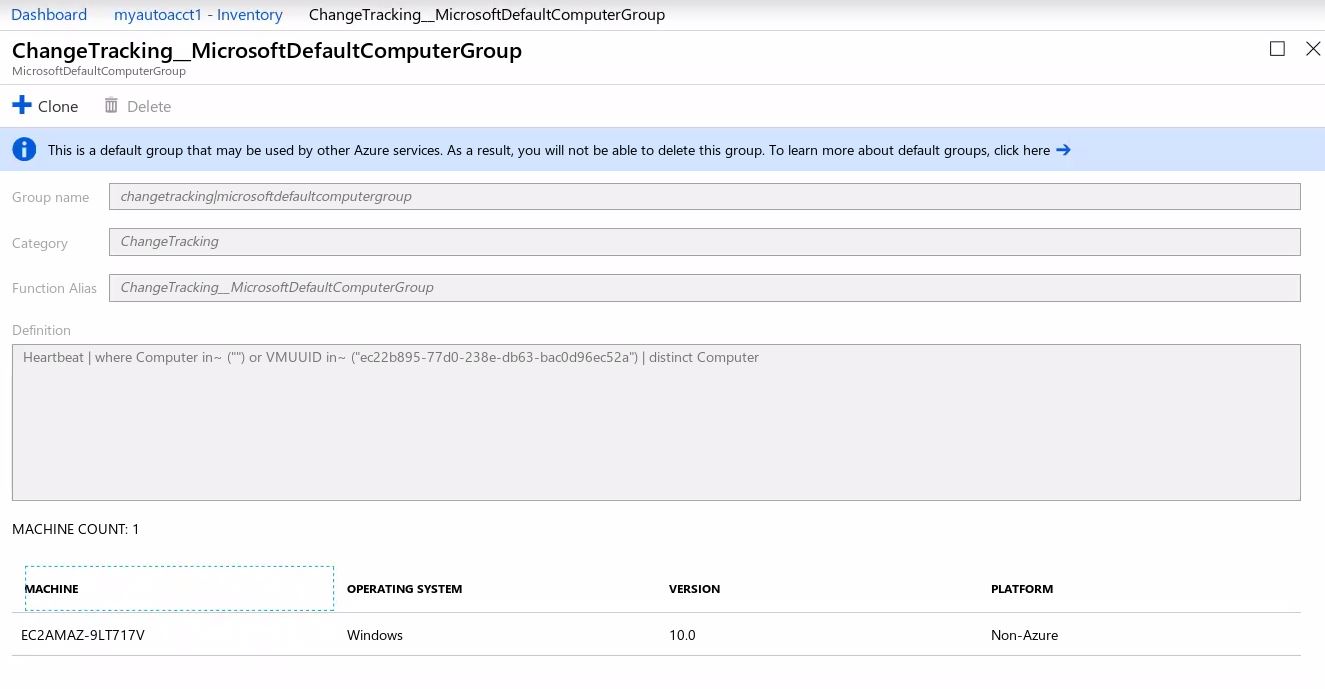
Lastly, the Inventory tools gives you the ability to add machines to a Machine Group. A default group is created when a machine is added to Inventory.
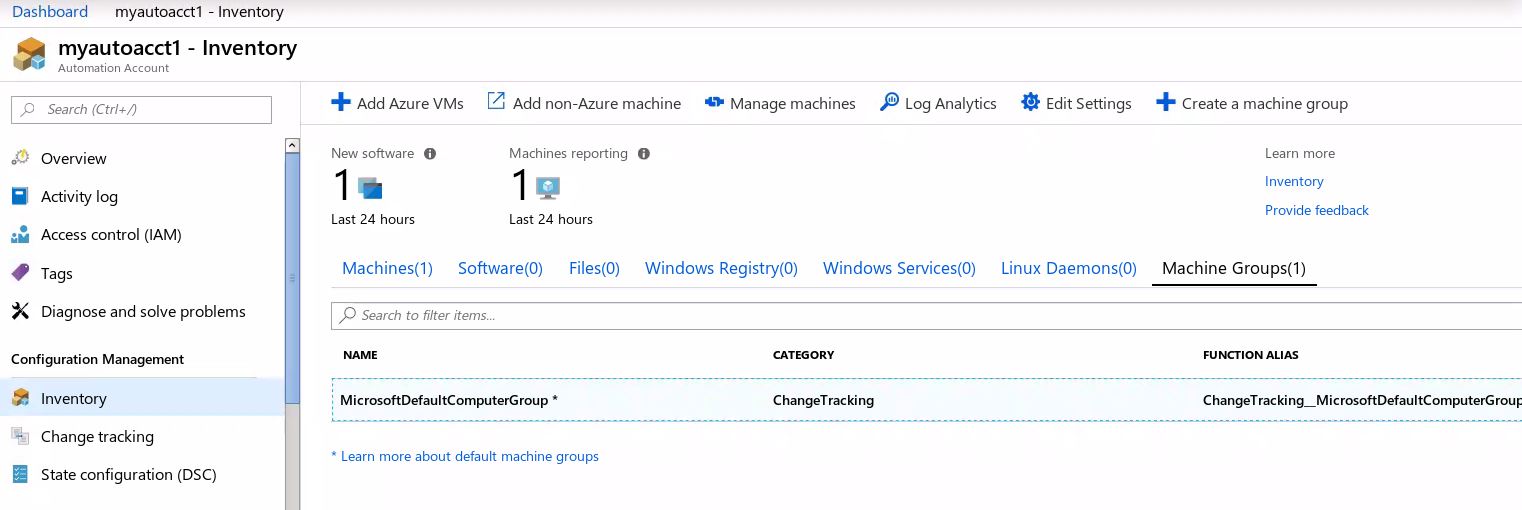
A Machine group is a group of machines defined by a Log Analytics KQL query. For instance, if you go to Machine groups and select the “MicrosoftDefaultComputerGroup“, you can see the query that was used to generate the group as well as member machines.
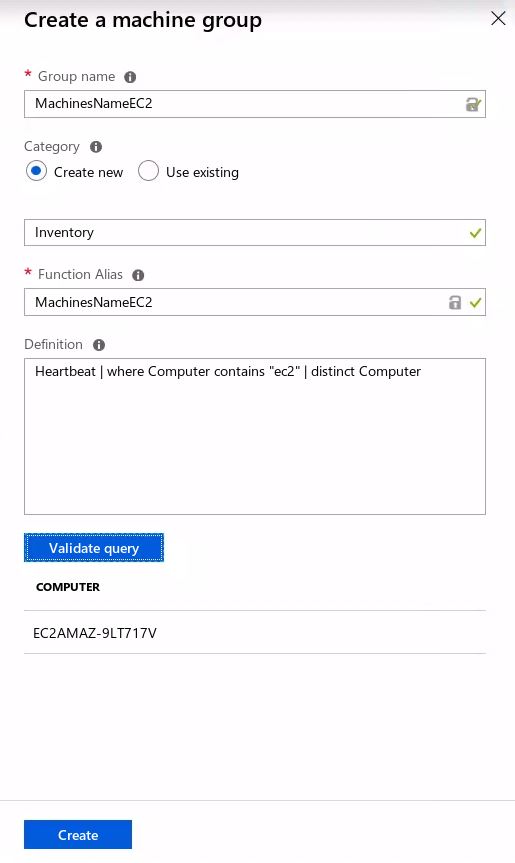
You can create your own Machine group as well. Click on “Create a Machine Group” on the Inventory screen and fill in the fields on the popup window below. Here, I’m creating a group of machines that contain “EC2” in the name. Once you enter a query in the definition box, validate the query and then create it. A more practical use case would be a group of machines that are missing updates.
This completes part 1 of Azure Configuration Management. Here, I covered how to enable Inventory, install the monitoring agent on an AWS VM and use Inventory to view a machines configuration. In Part 2 of this series I will cover Change Tracking.

Hi thanks for possting this
LikeLiked by 1 person