
Let me begin by stating that I am not a programmer or C# expert. I am a System engineer by trade, who has become proficient in Powershell scripting. When I first began working in IT, about 13 years ago, the first programming language that I tried to learn was Perl. At the beginning of that process, I immediately discovered programming is not for me and this relationship will not work. So I dumped Perl after a few “dates” and never looked back. However, that was then. Now, after having worked with Powershell to create scripts to automate tasks, I have developed a renewed interest in coding.
According to Jeffrey Snover, the inventor of Powershell, the intent behind Powershell was for it to be a glide path to C#. I guess you can say, mission accomplished.
In this article, I’m going to create a basic C# application in Visual Studio while using Powershell as reference to explain some of the concepts in C#. As the saying goes, use what you already know to learn new things. However, let’s review a few basics first.
FUNDAMENTALS
Before we dive into C# coding, it’s necessary that we briefly cover the essential elements related to the .Net Framework architecture. There are two main components of .Net Framework – Common Language Runtime (CLR) and Class Library. In a nutshell, the CLR is responsible for converting the compiled code of C# into the native code of the underlying machine. C# code is initially compiled into a format called Intermediate Language code (IL). This IL code is consumed by the CLR and converted into a format which is comprehensible to the underlying machine. This process flow is depicted in Figure 1.

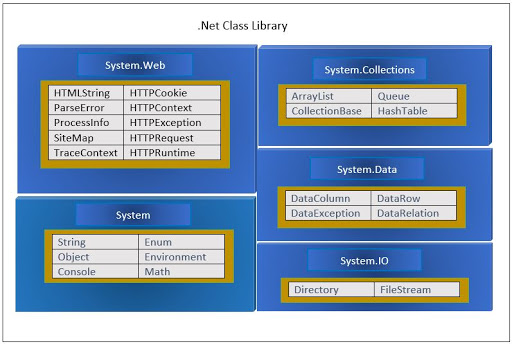
The second component which makes up the .Net framework architecture, the Class Library, is a set of namespaces, classes, interfaces and types that are used by the application to access the systems functionality. Here’s a small subset of the .Net Class Library in Figure 2.

Figure 2
Due to the number of classes, they need to be organized in a manner that is based on their function. This is the purpose of a Namespace – a container of related classes. In Figure 3 below, we see illustrated the structure of a .Net Framework namespace called “System”. The System namespace consists of multiple classes such as Console, DateTime, Math and many more not presented in the diagram. Powershell commands and C# code use namespaces to produce and manipulate instantiated instances (objects) of these classes, which contains various methods and properties.

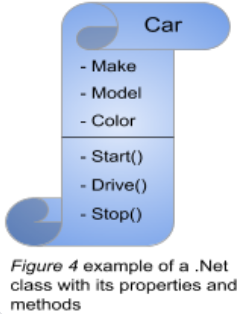
As mentioned, within each namespace are classes A class (Figure 4) is a container that consists of various methods and types. Methods allow you to perform certain actions against an object referenced by a class and a type describes its properties. In essence, a class can be seen as the blueprint used to build objects. For Instance, if you have a class called “Car”, it may have the following type categories: make, model, color, year, etc. Also, it will have methods which determine the actions that can be performed against a “Car” object such as: start(), drive(), stop() and so on. The types and methods of a class are known as the class members.
To build a fully functional C# application, we must assemble all of the necessary components that work in conjunction to produce a desired result. For instance, you may have an application that may need to output to the screen or work with a collection of data. These tasks will require you to make the System and System.Collections namespaces accessible to your application, along with the relevant classes. As the number of namespaces that your application uses increase, they will need to be organized into a unit called an “Assembly”. This is basically a DLL or EXE file (Figure 5).

Figure 5 C# Assembly (DLL or EXE)

Now that we have completed our review of the .Net Framework architecture and components, let’s proceed to doing some basic C# coding.
THE CODE
For this article, I will create a C# application that will retrieve the current date/time and output the results to the console screen.
Powershell
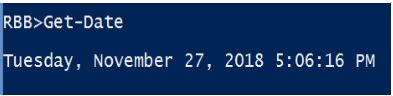
As you already know, in Powershell this is simply done by executing the “Get-Date” command shown in Figure 6.

Figure 6
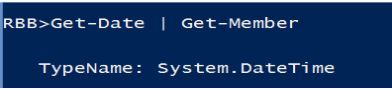
Another important point of significance is to know how Powershell reaches into .Net Framework to produce this output. If we pipe this command to “Get-Member”, we will see the TypeName or namespace and class the Get-Date command is referencing. In Figure 5, we see it’s using the DateTime class which is a member of the “System” namespace. Therefore, our C# code must also use the System.DateTime class to achieve the same result. For non-seasoned Powershellers, I omitted additional output produced by Get-Member in the Figure 7 screenshot. The Get-Member command also displays the methods and properties of objectified output that is passed to it via the pipeline.

Figure 7
C#
For this example, I will create a C# application that will retrieve the current date/time and output the results to the console screen. I will be using Visual Studio Community 2017 to accomplish this task.
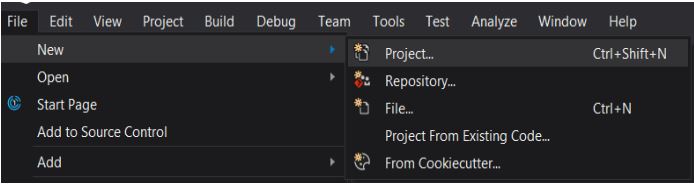
First, open Visual Studio and go to File > New > Project (CTRL + Shift + N) as shown below in Figure 8.

Figure 8
In the window that appears (Figure 9), expand Visual C#, select > .Net Core and then choose Console App (.Net Core).
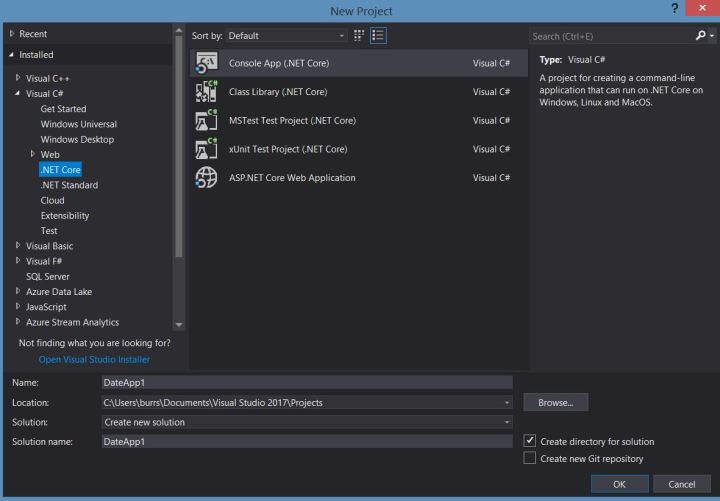
Figure 9

Notice you are given several settings to configure:
- Name: Give your Project a name. I will call mine DateApp1.
- Location: Choose a location to store your project (or use the default location).
- Solution: You can create a new solution or use and existing one. A solution contains the project and build information. Also, it can have multiple projects.
- Solution Name: By default, this will be the same name you give the Project. You can give it a different name but I will leave the default.
- Create new Git repository: Check this box to create a Git repository. I will leave it unchecked.
Once all the settings are configured, hit “OK”. You will now see below in Figure 10, a window with a basic structure of your C# program.
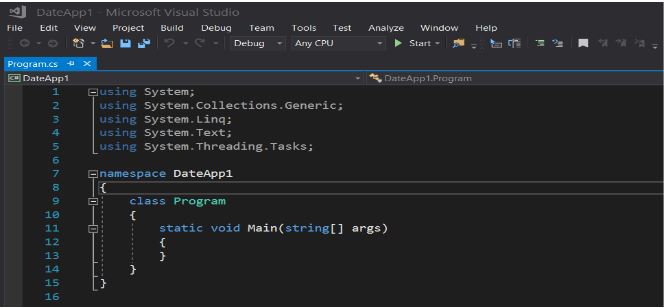
Figure 10

Let me explain the above: By default, certain namespaces are automatically added to a new program, each of which is preceded by the “using” keyword. But remember, for our project we will only need to use the “System” namespace. It contains the class (DateTime) that our application requires. Also, notice that a namespace is created that matches the name of the project, as well as a class called “Program”. Both can be changed to a different name. The final piece added is a static method that can accept multiple string parameters. It has a “void” keyword, meaning it doesn’t return a value. A static method is one that can be called without creating an instance of the class it’s a member of. Look to the following Powershell examples to provide further explanation:

Figure 11 Powershell static method of the
DateTime class to add 5 days to the current date
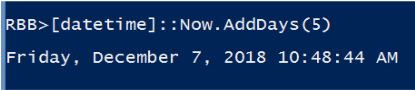

Figure 12 Powershell instance method of the
DateTime class variable ($date) to add 5 days
to the current date
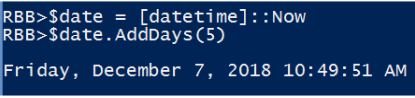
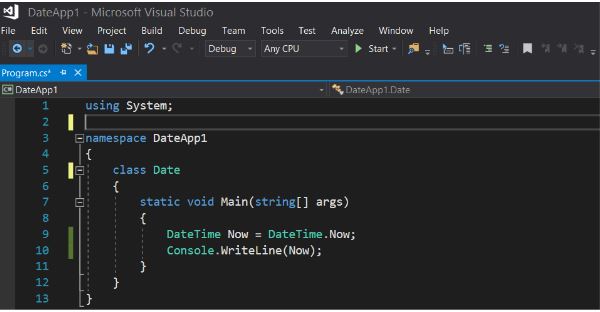
Figure 13 shows the structure of our DateTime app after removing the unused .Net namespaces, changing the Class name and adding the code to produce the current date on the screen. To achieve this, create a variable called “Now” and assign it to the DateTime.Now property. In C#, a variable is created by preceding the variable name with the name of the .Net class it’s using. And finally, add the Console.Writeline method with a “Now” argument. Also, notice the “System” namespace is now highlighted, which indicates it’s being used.

Figure 13
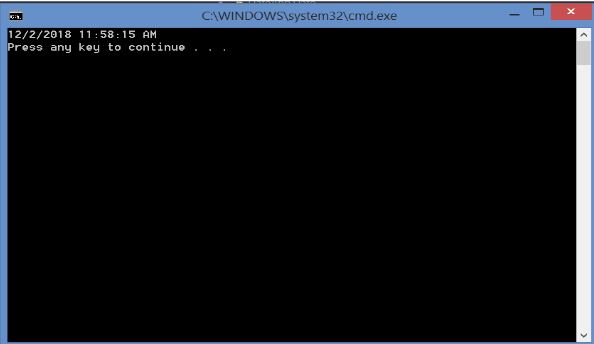
To compile and execute the above code, press CTRL + F5. If the build is successful, you will get a pop-up Command window showing the current date and time(Figure 14). By default, it’s displayed in a long date and time format.

Figure 14
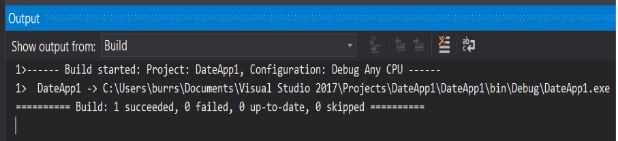
Visual Studio will also show output detailing the Build results. It displays the location of the application executable file and if the Build succeeded or failed.

Figure 15
In summary, in this article I explained the fundamentals of .Net Framework and created a basic C# application that outputs the current date and time to the console.

I like the efforts you have put in this, appreciate it for all the great content.
LikeLike
Thank you!
LikeLike